Perform Updates in Existing Clusters
This topic describes how to perform updates in existing cluster installations with Replicated KOTS. It includes information about how to update applications and the version of KOTS running in the cluster.
Update an Application
You can perform an application update using the KOTS Admin Console or the KOTS CLI. You can also set up automatic updates. See Configure Automatic Updates.
Using the Admin Console
Online Environments
To perform an update from the Admin Console:
-
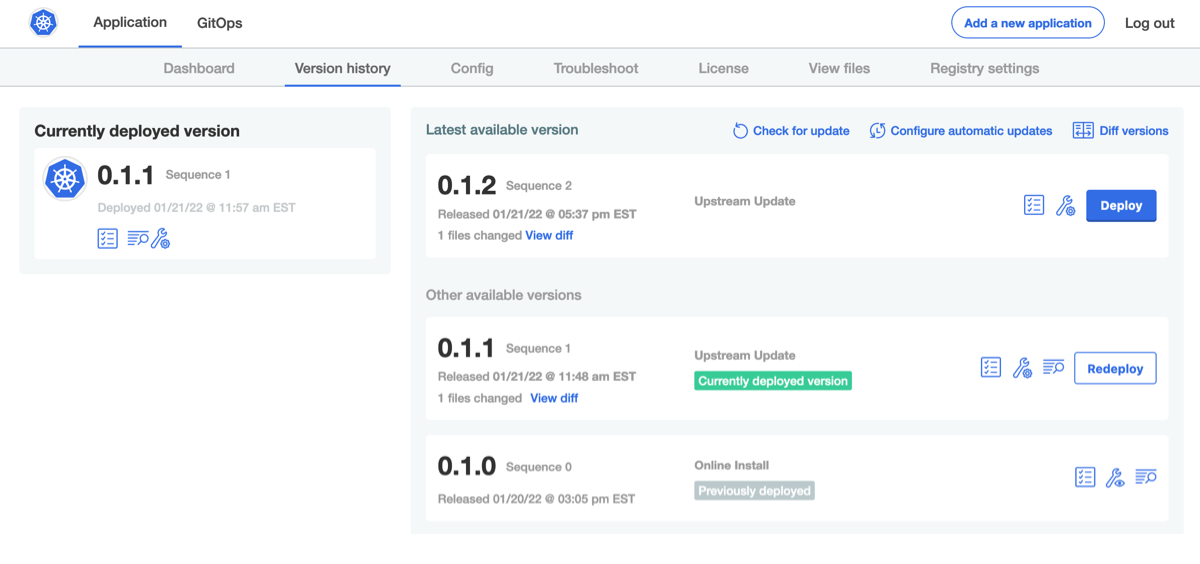
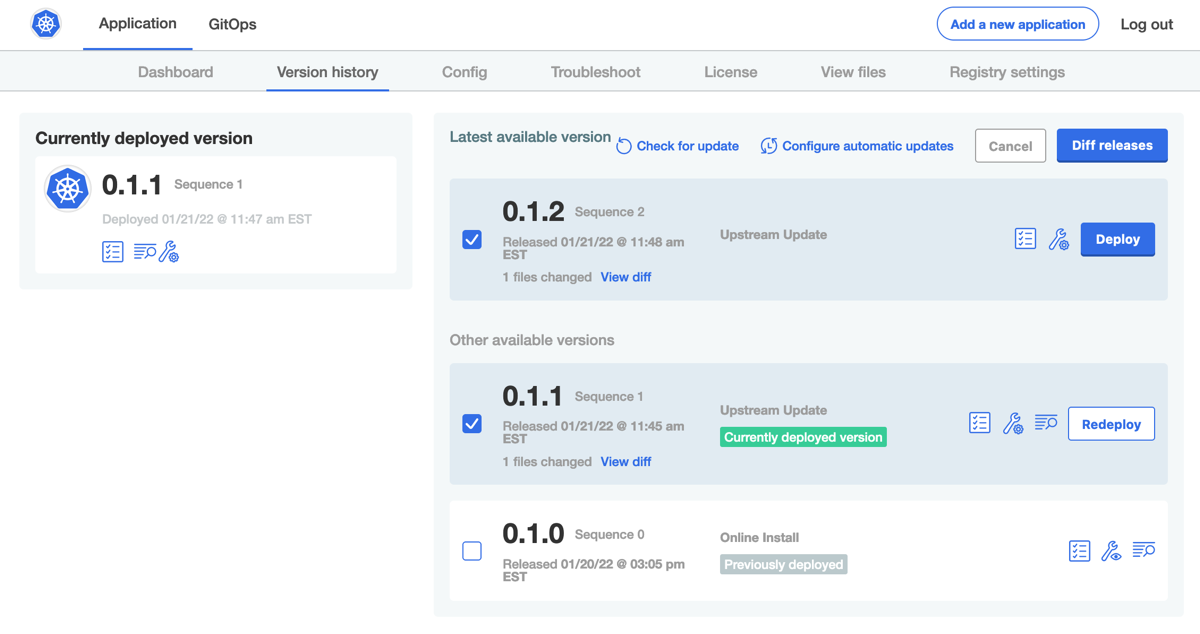
In the Admin Console, go to the Version History tab.
-
Click Check for updates.
A new upstream version displays in the list of available versions.

-
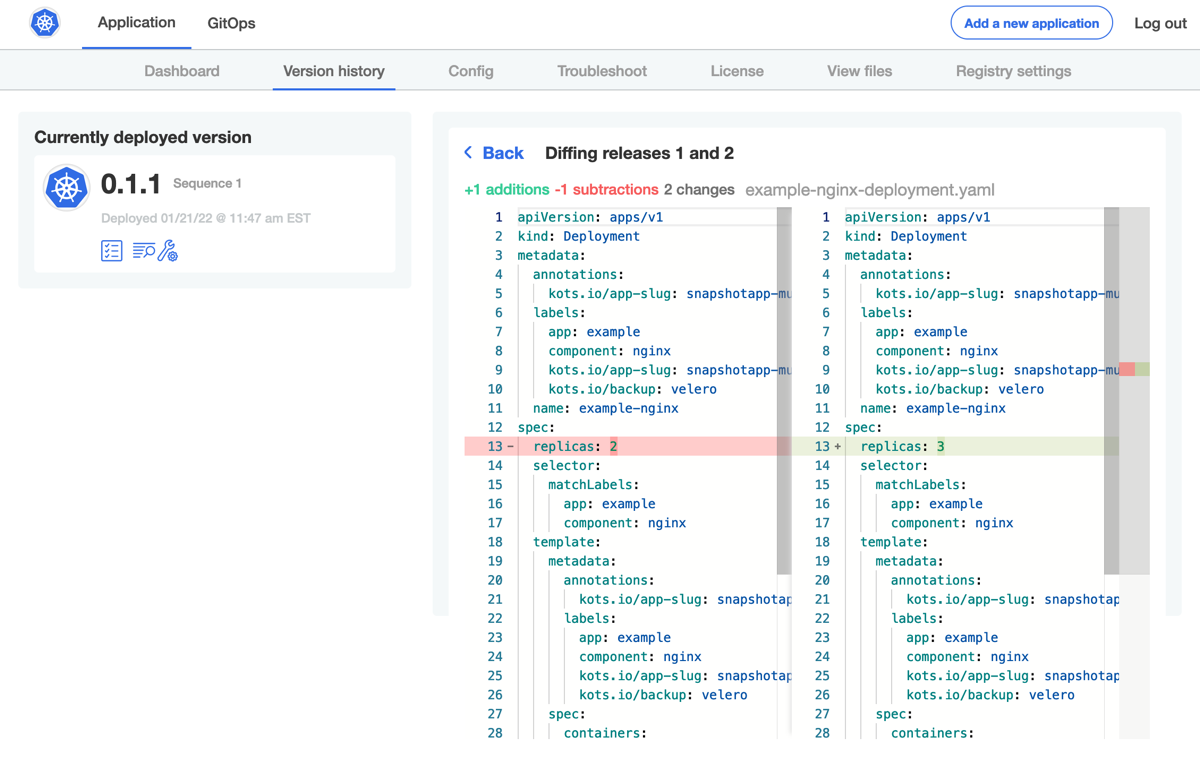
(Optional) When there are multiple versions of an application, you can compare the changes between them by clicking Diff releases in the right corner.
You can review changes between any two arbitrary releases by clicking the icon in the header of the release column. Select the two versions to compare, and click Diff releases to show the relative changes between the two releases.

View a larger version of this image

-
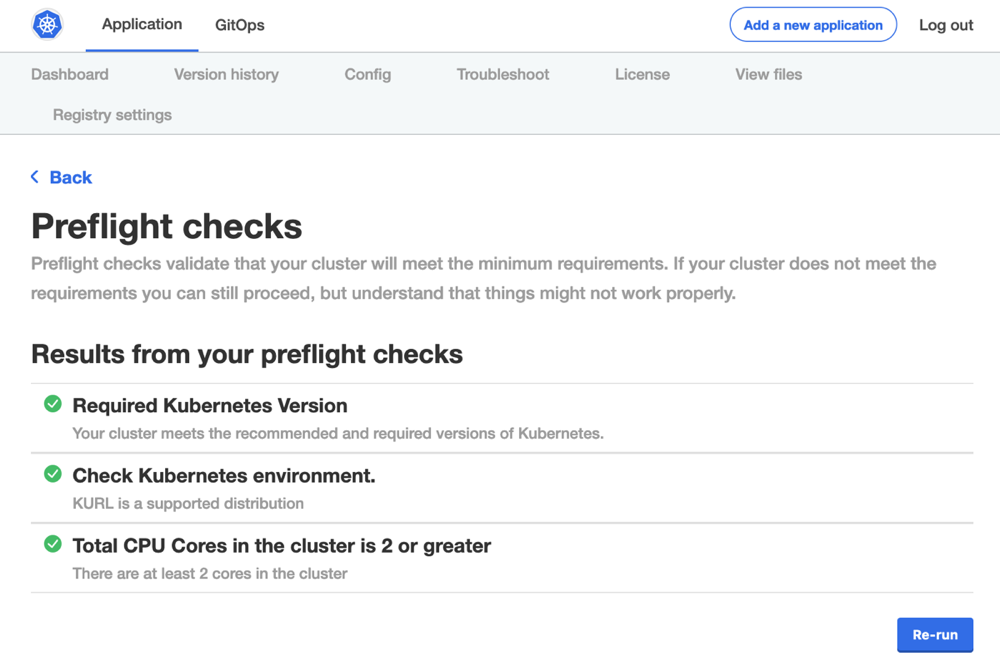
(Optional) Click the View preflight checks icon to view or re-run the preflight checks.
-
Return to the Version History tab and click Deploy next to the target version.
Air Gap Environments
To perform an air gap update from the Admin Console:
-
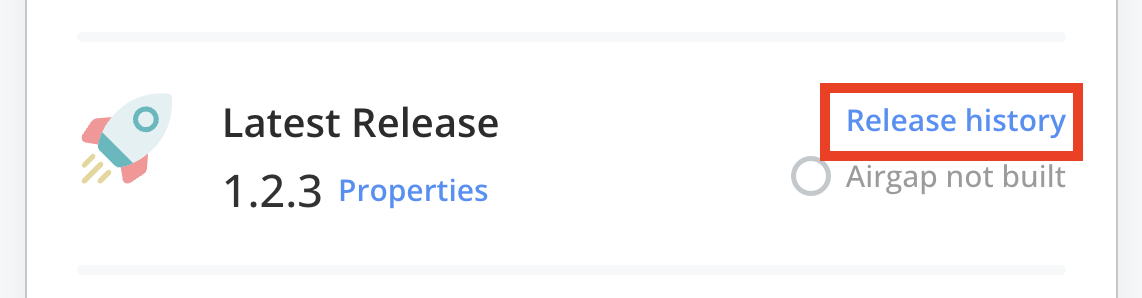
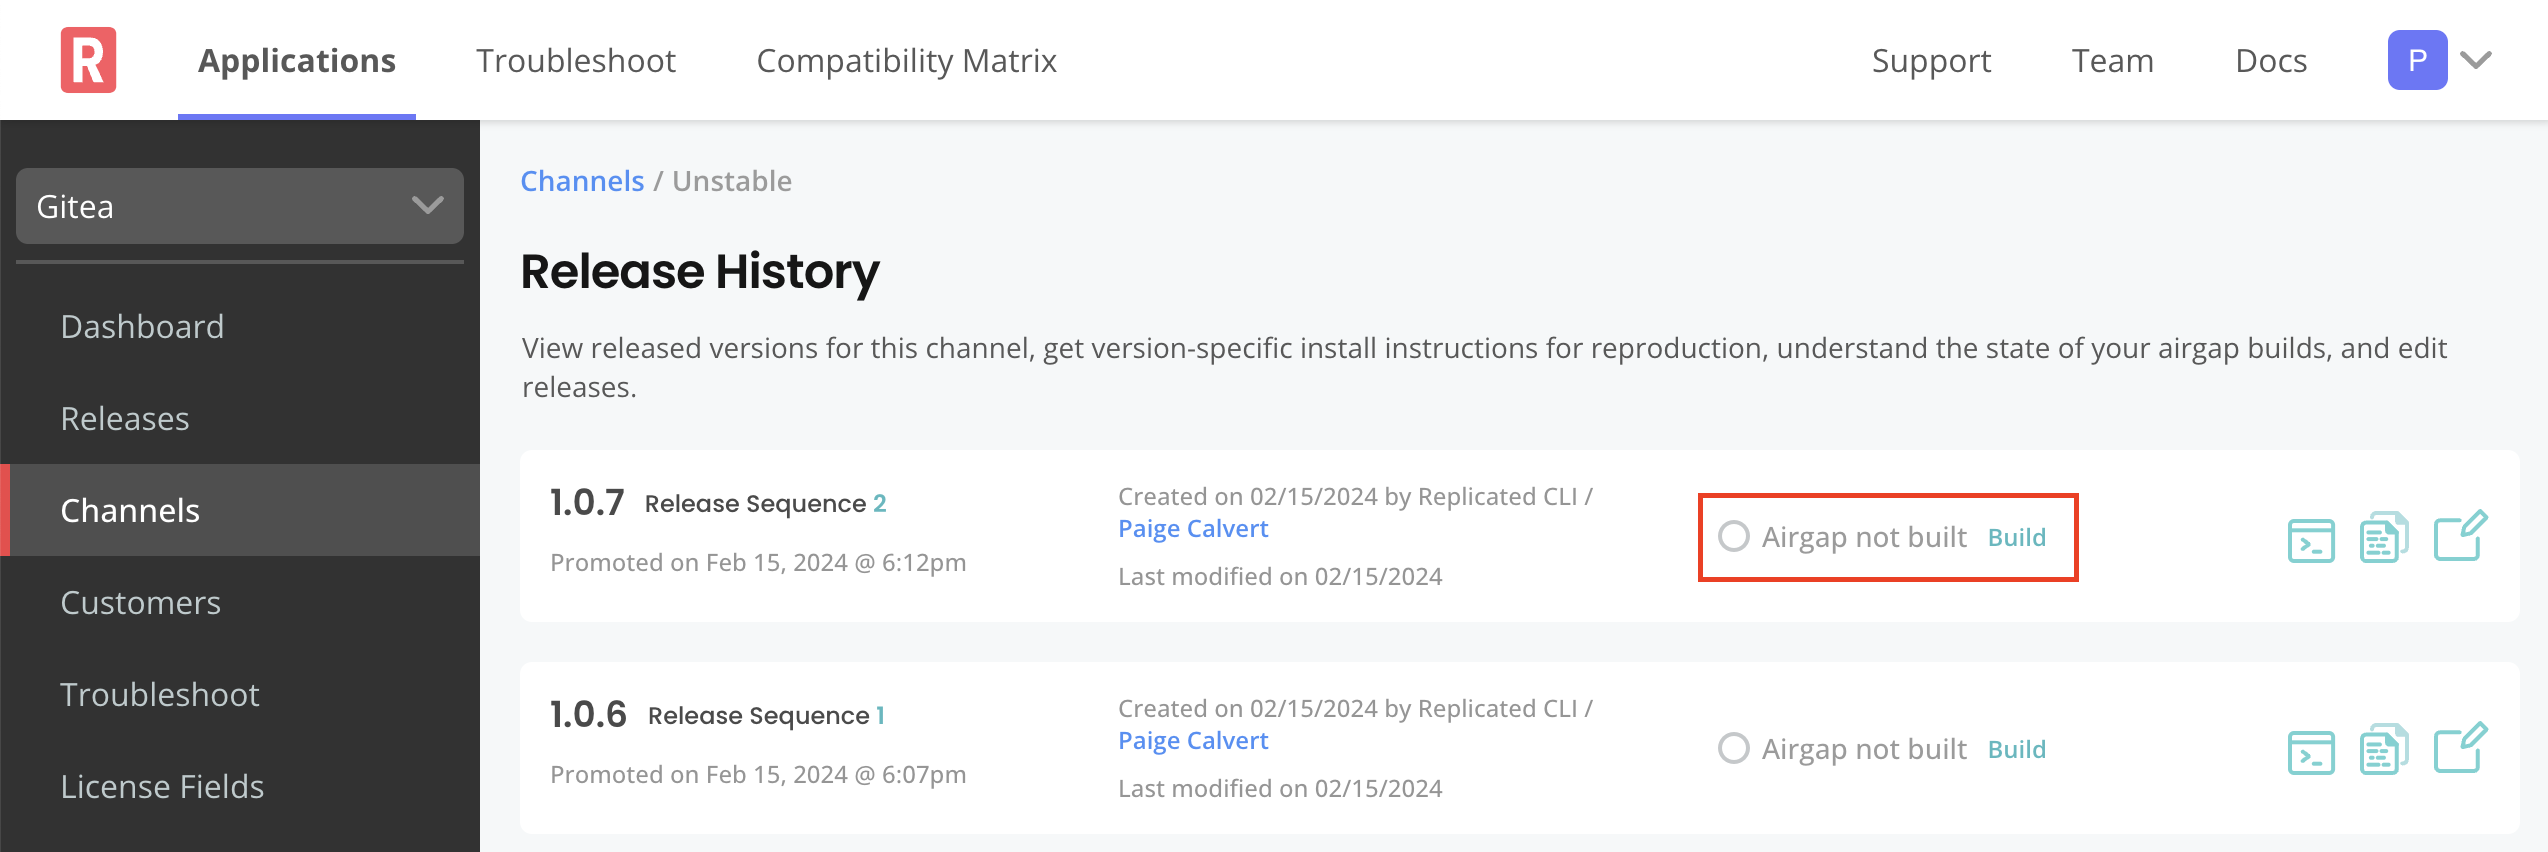
In the Vendor Portal, go the channel where the target release is promoted to build and download the new
.airgapbundle:-
If the Automatically create airgap builds for newly promoted releases in this channel setting is enabled on the channel, watch for the build status to complete.
-
If automatic air gap builds are not enabled, go to the Release history page for the channel and build the air gap bundle manually.
View a larger version of this image
-
-
After the build completes, download the bundle. Ensure that you can access the downloaded bundle from the environment where you will install the application.
-
(Optional) View the contents of the downloaded bundle:
tar -zxvf AIRGAP_BUNDLEWhere
AIRGAP_BUNDLEis the filename for the.airgapbundle that you downloaded. -
In the Admin Console, go to the Version History tab.
-
Click Upload a new version.
A new upstream version displays in the list of available versions.
-
(Optional) When there are multiple versions of an application, you can compare the changes between them by clicking Diff releases in the right corner.
You can review changes between any two arbitrary releases by clicking the icon in the header of the release column. Select the two versions to compare, and click Diff releases to show the relative changes between the two releases.
-
(Optional) Click the View preflight checks icon to view or re-run the preflight checks.

-
Return to the Version History tab and click Deploy next to the target version.
Using the KOTS CLI
You can use the KOTS CLI upstream upgrade command to update an application in existing cluster installations.
Online Environments
To update an application in online environments:
kubectl kots upstream upgrade APP_SLUG -n ADMIN_CONSOLE_NAMESPACE
Where:
APP_SLUGis the unique slug for the application. See Get the Application Slug in Managing Applications.ADMIN_CONSOLE_NAMESPACEis the namespace where the Admin Console is running.
Add the --deploy flag to automatically deploy this version.
Air Gap Environments
To update an application in air gap environments:
-
In the Vendor Portal, go the channel where the target release is promoted to build and download the new
.airgapbundle:-
If the Automatically create airgap builds for newly promoted releases in this channel setting is enabled on the channel, watch for the build status to complete.
-
If automatic air gap builds are not enabled, go to the Release history page for the channel and build the air gap bundle manually.
View a larger version of this image
-
-
After the build completes, download the bundle. Ensure that you can access the downloaded bundle from the environment where you will install the application.
-
(Optional) View the contents of the downloaded bundle:
tar -zxvf AIRGAP_BUNDLEWhere
AIRGAP_BUNDLEis the filename for the.airgapbundle that you downloaded. -
Run the following command to update the application:
kubectl kots upstream upgrade APP_SLUG \
  --airgap-bundle NEW_AIRGAP_BUNDLE \
  --kotsadm-registry REGISTRY_HOST[/REGISTRY_NAMESPACE] \
  --registry-username RO_USERNAME \
  --registry-password RO_PASSWORD \
  -n ADMIN_CONSOLE_NAMESPACE
Replace:
APP_SLUGwith the unique slug for the application. See Get the Application Slug in Managing Applications.NEW_AIRGAP_BUNDLEwith the.airgapbundle for the target application version.REGISTRY_HOSTwith the private registry that contains the Admin Console images.REGISTRY_NAMESPACEwith the registry namespace where the images are hosted (Optional).RO_USERNAMEandRO_PASSWORDwith the username and password for an account that has read-only access to the private registry.ADMIN_CONSOLE_NAMESPACEwith the namespace where the Admin Console is running.
Add the --deploy flag to automatically deploy this version.
Update KOTS
This section describes how to update the version of Replicated KOTS running in your cluster. For information about the latest versions of KOTS, see KOTS Release Notes.
Downgrading KOTS to a version earlier than what is currently deployed is not supported.
Online Environments
To update KOTS in an online existing cluster:
-
Run one of the following commands to update the KOTS CLI to the target version of KOTS:
-
Install or update to the latest version:
curl https://kots.io/install | bash -
Install or update to a specific version:
curl https://kots.io/install/VERSION | bashWhere
VERSIONis the target KOTS version.
For more KOTS CLI installation options, including information about how to install or update without root access, see Install the KOTS CLI.
-
-
Run the following command to update the KOTS Admin Console to the same version as the KOTS CLI:
kubectl kots admin-console upgrade -n NAMESPACEReplace
NAMESPACEwith the namespace in your cluster where KOTS is installed.
Air Gap Environments
To update KOTS in an existing air gap cluster:
-
Download the target version of the following assets from the Releases page in the KOTS GitHub repository:
- KOTS Admin Console
kotsadm.tar.gzbundle - KOTS CLI plugin
Ensure that you can access the downloaded bundles from the environment where the Admin Console is running.
- KOTS Admin Console
-
Install or update the KOTS CLI to the version that you downloaded. See Manually Download and Install in Installing the KOTS CLI.
-
Extract the KOTS Admin Console container images from the
kotsadm.tar.gzbundle and push the images to your private registry:kubectl kots admin-console push-images ./kotsadm.tar.gz REGISTRY_HOST \
--registry-username RW_USERNAME \
--registry-password RW_PASSWORDReplace:
-
REGISTRY_HOSTwith the hostname for the private registry. For example,private.registry.hostormy-registry.example.com/my-namespace. -
RW_USERNAMEandRW_PASSWORDwith the username and password for an account that has read and write access to the private registry.noteKOTS does not store or reuse these read-write credentials.
-
-
Run the following command using registry read-only credentials to update the KOTS Admin Console:
kubectl kots admin-console upgrade \
  --kotsadm-registry REGISTRY_HOST \
  --registry-username RO_USERNAME \
  --registry-password RO_PASSWORD \
  -n NAMESPACE
Replace:
REGISTRY_HOSTwith the same private registry from the previous step.RO_USERNAMEwith the username for credentials with read-only permissions to the registry.RO_PASSWORDwith the password associated with the username.NAMESPACEwith the namespace on your cluster where KOTS is installed.
For help information, run
kubectl kots admin-console upgrade -h.